UltiDev Cassini Web Server Release Candidate 1
version is now obsolete.
If you are using this or older version, we recommend
upgrading to
the latest version of Cassini.
If you are still
using "Beta 1" version, please refer to
Beta 1 Developer's Guide
for information.
Cassini Overview
Cassini for ASP.NET
Application Developers
Downloading and Installing
Cassini
Checking whether your existing
application is compatible with Cassini
Debugging your Application with
Cassini
Using Cassini Explorer Web
Service to Get Application Port Information
Packaging and Distributing
ASP.NET Cassini Applications
UltiDev Cassini Overview
UltiDev
Cassini is a lightweight web server capable of hosting ASP.NET applications
& web services, as well as static HTML web sites.
UltiDev Cassini is highly improved compared to original
Cassini web server sample from www.asp.net. Cassini's primary advantage is that it does not require IIS to be installed
on the target computer and that UltiDev Cassini can be
easily bundled with your ASP.NET application's setup
package.
UltiDev Cassini is absolutely free and requires no fees
of any kind at all, ever! The most natural place for Cassini is home PCs and office desktops – areas where enterprise software, like IIS, is not installed or supported.
Cassini for ASP.NET
Application Developers
Cassini, as it’s distributed by UltiDev LLC, is
based on code published at
www.asp.net. However, to make Cassini truly useful
and developer-friendly we added some very powerful
features:
-
We made Cassini a
windows service capable
of running multiple ASP.NET applications
simultaneously;
-
We added very simple .NET
API allowing
registering and
un-registering ASP.NET
applications with Cassini server;
-
We added
Cassini Explorer - ASP.NET application management user
interface. Cassini Explorer is an ASP.NET app running under
Cassini, of course;
-
And most important for developers, we added a
re-distributable setup package – Cassini
merge module, which you can include in your
application setup projects. Mere inclusion of
the Cassini merge module into your application
distribution package will install Cassini on
your clients’ computers.
The most exciting thing about UltiDev Cassini is that it
gets automatically installed on the target computer if
you merely include our Cassini redistributable package,
the merge module, in your application setup project.
Second step - registering your application with UltiDev
Cassini server, is very simple too - you don't have to
write any code. Simply hookup your setup project's
custom actions to Cassini configuration module and you
are done. Later in this document we provided
step-by-step walkthrough on how to create setup project
that will install Cassini and register your application
with it. In some advanced cases you may create your own
custom installer class and from there invoke application
registration functionality from the
Cassini Configuration API. Alternatively, you can launch stand-alone registration utility shipped with Cassini.
Cassini web server can be used as a standalone, non-service
application, which allows convenient debugging of your ASP.NET application.
Cassini comes in two versions that are functionally identical, but target
different versions of .NET Framework. Cassini 1.1 supports ASP.NET applications
compiled for ASP.NET 1.0 and 1.1 and requires .NET Framework 1.1 to run. Cassini
2.0 supports applications compiled for ASP.NET 1.0, 1.1 and 2.0, and requires
.NET Framework 2.0 to run. The decision which one to use will be driven by what
version of CLR you expect your customers will have, as well as what version of
ASP.NET your application was made for.
The remainder of this document is the set of
detailed walkthroughs explaining how to make your
ASP.NET application working with Cassini, how to
debug with it, and how to create setup packages that
bundle
your ASP.NET application with UltiDev Cassini Web
Server.
Downloading and Installing Cassini
You can download and install Cassini from UltiDev.com
download page. During installation Cassini won’t ask you
for anything and will just install itself, register its
components, and create an “UltiDev | Cassini Web Server” group in the Programs menu. There you will find
shortcuts to Cassini application configuration UI, and
some other useful functionality.
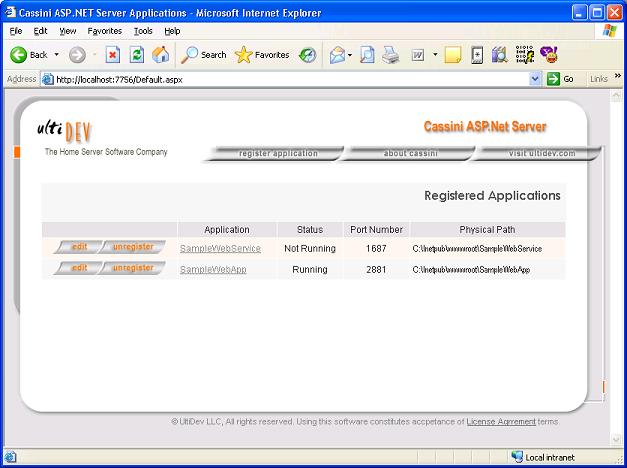
Checking whether your existing application is compatible
with CassiniAfter you installed Cassini on your development box, the
first thing you may want to do is register your existing
applications with Cassini. To do that, fire up Cassini
Explorer and click "register application" button. It’s OK if your applications are also
registered with IIS – Cassini and IIS coexist quite
peacefully. When registering an application with Cassini
the only required pieces of data are the application
GUID and the folder where application is located. Once
you have registered the application, see if it works by
clicking the application name link.
Application GUID is a means of avoiding duplications
when registering applications programmatically.
Registering an application with existing GUID will
replace previous application parameters, like name, port
and location, and replace it with new ones.
When registering an application it’s highly recommended that
you let Cassini assign a free port to your application
instead of specifying the port explicitly. Regardless
what port your application is on, you can always access the
application by pointing your browser to
http://localhost:7756/GoToApplication.aspx?AppID=<your
application GUID>. That is a never-changing port-independent URL to your
application. If your ASP.NET application contains web
services, your web service client can call Cassini
Explorer web service at
http://localhost:7756/CassiniConfigurationService.asmx
to figure out what is the exact URL of the application
hosting your web service. It's not quite a UDDI, but it
gets your dynamic binding problem solved.
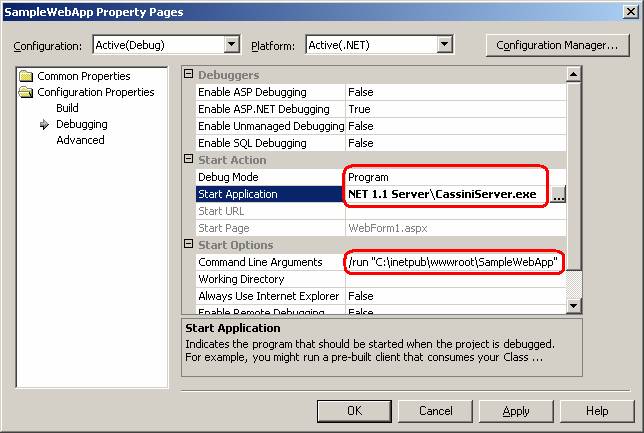
Debugging your Application with Cassini
You can debug your application under Cassini server
using one of two options. First, less convenient, is to
attach the debugger to CassiniServer.exe (or
CassiniServer2.exe for ASP.NET 2.0) process. Second -
the more convenient one is to run ultiDev Cassini Web Server as a
standalone console application. To do that switch from
Project to Program debugging in your Visual Studio Project
Settings, specify “C:\Program Files\UltiDev\Cassini
ASP.NET 1.1 Server\CassiniServer.exe” as an application,
and set command line arguments to “/run” “c:\inetput\wwwroot\yourApplicationFolder”,
or whatever the path to your application folder.
That’s about it. When you hit Build | Debug, Cassini
will start hosting your
application in console mode, and will launch the browser pointing to
your application. You will be able to stop at
breakpoints and inspect variable values just as if it
was debugging under IIS. CassiniServer.exe takes some
more optional parameters along with /run command, so you
could tell what port, application ID, and browser to use
so you could debug the application with FireFox or any
other browser. Run CassiniServer.exe or CassiniServer2.exe
with /? command line switch to get information on
console mode usage of the UltiDev Cassin Web Server.Using Cassini Explorer Web Service to
Get Application Port Information
As a rule, Cassini applications should let the system
find and assign a free TCP port to the application.
Client, of course, will not know exact location of your
application, because on one box it could be
http://localhost:1234/, and on another it could be
http://localhost:5678/. Cassini Explorer always runs on
the same fixed port 7756, and it has a redirector page
that will redirect browser to your application by
application ID. For web services situation was
different. Before RC1 version of Cassini, web services
clients had no way of finding out the exact URL of the
web application at run time. So the solution was to
register a web service app on the same port, which
raises the likelihood of port collisions. To avoid that
RC1 ships with a
web service that returns the exact, port-sensitive
URL of an application by application ID. Your web
service client can call that web service to get your web
service's URL.
Packaging and Distributing ASP.NET Cassini Applications
Distributing your Cassini application is quite simple.
All you need to do is to to create a regular Setup
Project (not a web setup project – that’s for IIS installations), include CassiniRedistributable.msm (or Cassini2Redistributable.msm for ASP.NET 2.0
applications) merge module into the setup project, and finally invoke
pre-packaged custom installer
steps to register and un-register your application. Mere inclusion of the
Cassini merge module into the project will ensure the UltiDev Cassini Web Server gets installed and
fired up before your application gets installed. By the time your
application is ready to register itself with Cassini, UltiDev Cassini Web Server is already up and
running.
You can download sample Visual Studio solutions
containing an ASP.NET application and a Setup project
bundling the application and UltiDev Cassini web server.
UltiDev Cassini Web Server needs to be
installed for
samples to build.
Download ASP.NET 1.1 and Visual Studio 2003 setup
project sample.
(Getting 1.1 sample
to work could a bit painful as you will have to create
IIS virtual folder pointing to the application).
Download ASP.NET 2.0 and Visual Studio 2005 setup
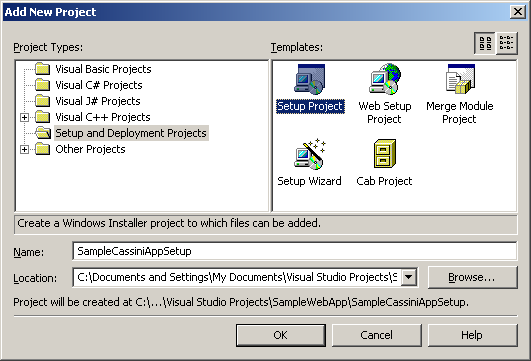
project sample. Here are the detailed steps describing creation of Setup Project for a
Cassini-based ASP.NET application.
-
Add a new setup project to your existing ASP.NET web application
solution. Please note that Express editions of Visual Studio 2005 may not allow
adding multiple projects to a solution.
- Ensure that your setup is going to be built. For that
right-click the solution and select Configuration
Manager. There check the "Build" checkbox for your setup
project for at least Release build configuration.
-
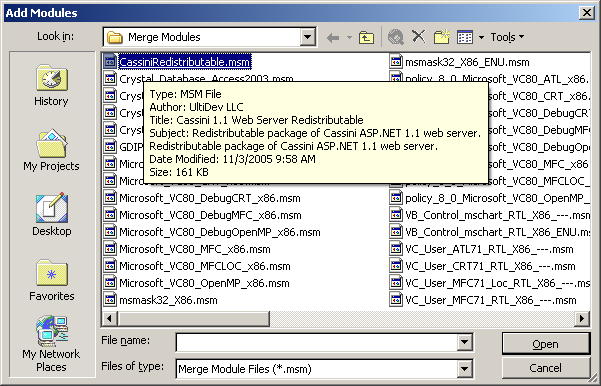
Add Cassini merge module to your setup project from
“C:\Program Files\Common Files\Merge Modules” folder.
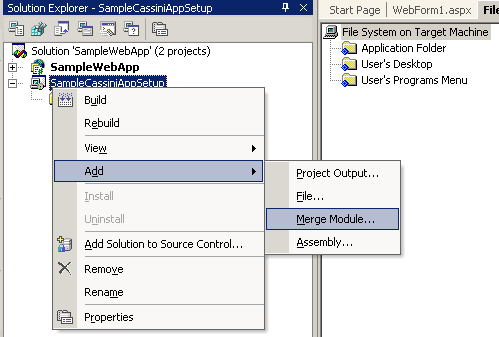
For Cassini 1.1 select CassiniRedistributable.msm file:
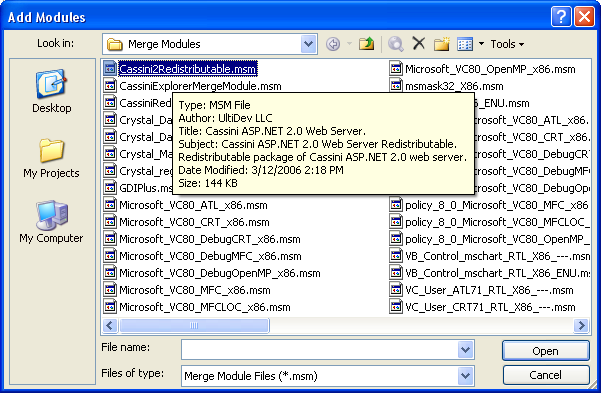
For Cassini 2.0 select Cassini2Redistributable.msm file:
-
Add your application files to the setup project.

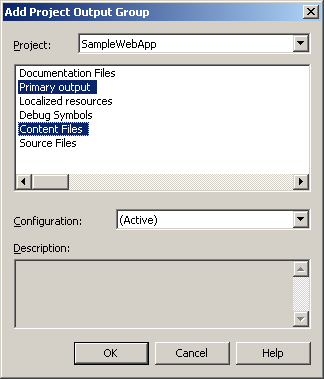
Please note that in Visual Studio 2.0 you may only be
offered to add Content Files. It's OK - do just that.
- Add CassiniConfiguration.dll to the Setup project.
CassiniConfiguration.dll assembly is a part of UltiDev
Cassini package and it contains custom installer class
that can be invoked from a Setup project to register or
un-register an ASP.NET application with UltiDev Cassini.
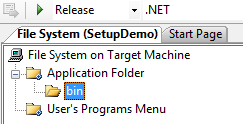
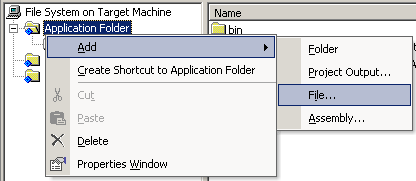
To add CassiniConfiguration.dll to your Setup project,
using Setup project's File System View, create a Bin
folder under the Application Folder:
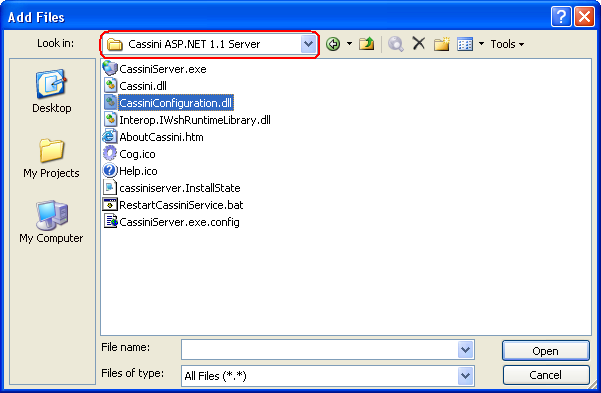
Then add right-click on Bin folder and select Add |
File... In the Open File dialog navigate to UltiDev
Cassini folder, which is usually "C:\Program
Files\UltiDev". There, for ASP.NET 1.1 project, open the
"Cassini ASP.NET 1.1 Server" folder and select
CassiniConfiguration.dll:
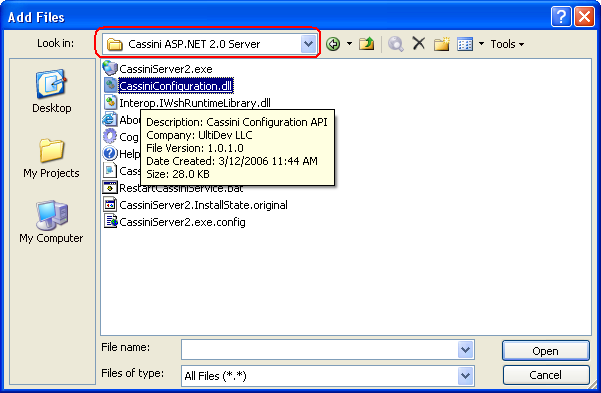
For ASP.NET 2.0 applications open "Cassini ASP.NET 2.0
Server" folder and select CassiniConfiguration.dll:
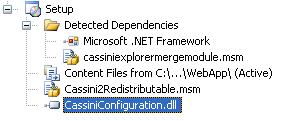
After you have added CassiniConfiguration.dll, your
Setup project will look like this:
- Hook up custom installer actions.
On this step you will hookup custom installer class of CassiniConfiguration to
your setup project's custom installer actions.
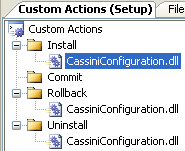
Start with creating Install, Rollback and Uninstall
custom actions pointing to the CassiniConfiguration.dll
you've just added. To do that switch to the Custom
Actions View of the Setup project and right-click on
Install, Rollback and Uninstall actions and select Add
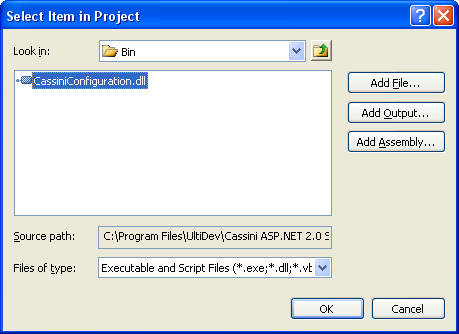
Custom Action menu item. In the Select Item dialog
navigate to the Application Folder\Bin folder and select
CassiniConfiguration.dll for each custom action:
The result will look like this:
At this point you hooked up Cassini custom installer
class with your setup project's custom installer
actions. Now you just need to pass your specific
application's registration information to the Cassini.
"Install" action requires several parameters, while
Rollback and Uninstall steps require only one parameter
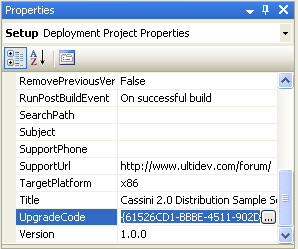
- application ID. Application ID should be a unique
GUID. You can either generate a new GUID using MS
Guidegen.exe utility, or better, just reuse an
UpgradeCode of your setup project. To get UpgradeCode
value of your setup project, bring up Setup project's
properties:
... and save the GUID value in the Notepad or in some
other handy place.
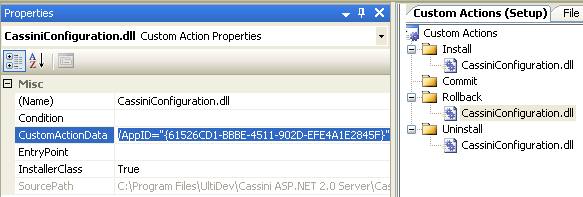
To specify application ID for Rollback action, select
CassiniConfiguration.dll under Rollback bin and set
CustomActionData property value to /AppID="<your
application ID just generated>":
Then repeat the same for the Uninstall action.
CustomActionData values for Rollback and Uninstall steps
should be identical.
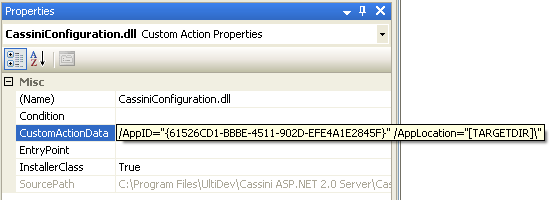
"Install" action has following parameters passed via
CustomActionData property:
| Parameter |
|
Meaning |
Example |
|
/AppID |
Required |
Application ID |
/AppID="{61526CD1-BBBE-4511-902D-EFE4A1E2845F}" |
| /AppLocation |
Required |
Physical
location of the application. Should always be set to
"[TARGETDIR]\". |
/AppLocation="[TARGETDIR]\" |
| /AppName |
Optional |
Application
Name |
/AppName="Test Cassini 2.0 Setup App" |
| /AppDescription |
Optional |
Application
Description |
/AppDescription="some useful text" |
|
/AppPort |
Optional |
Application
Port |
/AppPort="80" |
Don't specify the port explicitly if possible! Cassini
Explorer can redirect user's browser to the correct application URL by
application ID if you point the browser to
http://<macchinename>:7756/GoToApplication.aspx?AppID=<your
application ID>.
Web service clients can too call
Cassini Explorer web service at
http://<machinename>:7756/CassiniConfigurationService.asmx
to get your application's URL. |
| /AppDefaultDoc |
Optional if
default document is Default.aspx or
Index.htm |
Default
application document |
/AppDefaultDoc="WebForm1.aspx" |
|
/AppKeepRunning |
Optional |
Flag telling if
application should always be kept in memory for
quick first-page response. Default value is true. |
/AppKeepRunning="false" |
Here's the example of the Install action's
CustomActionData value:
At this point you can build your solution to and test
the installation. From this point forward the information
in this document
is not really related to application + Cassini
installation, but rather just a general helpful tip for
your non-IIS web application setup.
-
If you want to add a Programs menu shortcut to your application, please do
following.
Add an Html Page file to your application project and call is something like
LocalStart.htm.
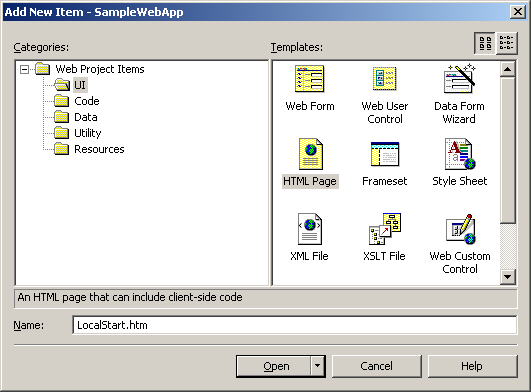
Open the file in text editor and
replace its content with the following:
<!DOCTYPE HTML PUBLIC
"-//W3C//DTD HTML 4.0 Transitional//EN">
<html>
<head>
<title></title>
<meta
http-equiv="refresh"
content="0;url=http://localhost:7756/GoToApplication.aspx?AppID=61526CD1-BBBE-4511-902D-EFE4A1E2845F"/>
</head>
<body>
</body>
</html> Replace highlighted GUID with your application's
actual ID.
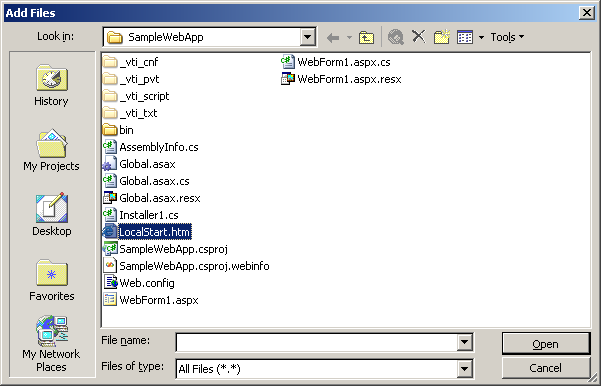
Now to work around some kinks of the setup project, add
the LocalStart.htm file to your setup project’s
Application Folder:
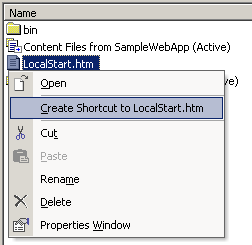
After that, right-click the LocalStart.htm file in the
right pane of the File System window of the Setup
Project and click Create Shortcut menu item.
Rename the shortcut to reflect the name of your
application.
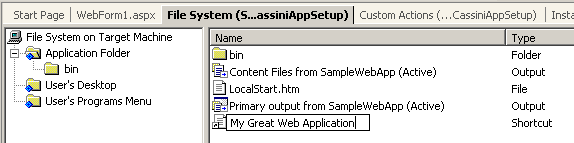
Drag & Drop the shortcut to the User’s Programs Menu.
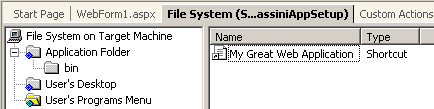
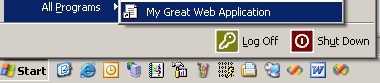
Build the solution and install your application. After
the installation you should see the shortcut in the
Programs menu.
Event though you probably know it already, VS.NET Setup
Projects often get their Detected Dependencies messed up
if you try to build the solution when your product is
installed. If your Detected Dependencies got out of
tune, uninstall your product, right-click the Detected
Dependencies folder in the Setup Project and do Refresh
Dependencies. After that all automatic dependencies
should get back to normal so you can build your
application with no problem.
|
 |